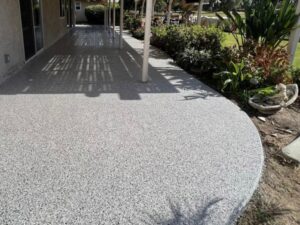

A well-maintained pool deck not only enhances the aesthetics of your outdoor space but also increases the longevity of the deck surface. Applying a high-quality floor coating to your pool deck provides extra protection against water damage, UV rays, and everyday wear and tear. However, proper preparation is key to ensuring the floor coating adheres well and lasts for years. Whether you’re tackling the project yourself or hiring a professional, following the right steps before applying the coating will guarantee a durable and visually appealing finish.
Below is a comprehensive guide on how to prepare your pool deck for floor coating application.
Clean the Pool Deck Thoroughly
Before any coating can be applied, the pool deck must be spotless. According to our friends at Nelson J. Greer Painting Contractors Inc., dirt, debris, mold, and algae can accumulate on the surface, all of which can interfere with the bonding process of the coating. Here’s how to clean the deck properly:
- Start by sweeping the entire area to remove loose dirt, leaves, and other debris.
- Use a pressure washer to deep clean the surface. The strong jets of water can dislodge stubborn dirt, mold, or algae that might be stuck to the surface.
- If there are any oil or grease stains, use a degreasing cleaner to break down the residue. Scrub the stains with a stiff brush and rinse thoroughly.
- For areas with mildew or algae buildup, mix a cleaning solution of water and a little bleach, scrubbing these areas with a stiff-bristled brush.
Allow the pool deck to fully dry before moving on to the next step. A damp surface can cause issues with adhesion when applying the floor coating.
Inspect the Deck for Damage
Once the deck is clean and dry, it’s time to inspect the surface for any cracks, chips, or other types of damage that may need repair. Applying a floor coating over damaged areas can lead to an uneven and ineffective finish, and it may cause problems with adhesion in the long term.
- Look for cracks in the concrete or surface material. Small cracks can usually be filled with a suitable concrete filler or patching compound.
- Examine the surface for areas where the concrete might be chipped, pitted, or flaking. Any areas showing signs of deterioration need to be repaired before applying the coating.
- Check for uneven areas, especially around the edges of the deck. Leveling compounds can be used to smooth out the surface if needed.
Be sure to allow any repairs to dry completely before continuing with the preparation process. Depending on the filler or patching product used, this can take anywhere from a few hours to a couple of days.
Etch the Surface (If Necessary)
Etching the surface of the pool deck is an important step for concrete decks, as it helps open up the pores in the concrete and allows the floor coating to bond more effectively. If your pool deck is made of concrete or similar material, etching can significantly improve the adhesion of the coating.
- Use a concrete etching solution, typically made from a mild acid like muriatic acid or a specialized product available at hardware stores.
- Dilute the etching solution according to the manufacturer’s instructions and carefully apply it to the deck using a sprayer or a watering can.
- After applying, scrub the surface with a stiff-bristled brush to ensure the solution penetrates the concrete pores.
- Once the etching process is complete, thoroughly rinse the entire deck with water to remove any residue. Make sure the deck is completely dry before moving forward.
Etching creates a slightly roughened surface, ideal for coating adhesion. However, some modern pool decks made of materials other than concrete may not require this step.
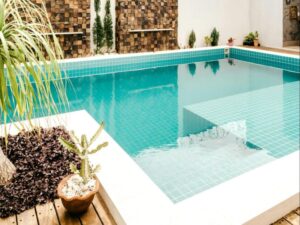
Mask and Protect Surrounding Areas
Floor coating applications can get messy, and you want to ensure the coating only goes where it’s intended. This is especially important around the pool, as you don’t want the coating to end up in the water or on pool equipment.
- Use painter’s tape to mask off the edges where the pool deck meets the pool itself, any steps, or other structures you want to protect.
- Cover nearby plants, outdoor furniture, and any pool equipment with drop cloths or plastic sheeting to prevent overspray or accidental drips.
- If you’re planning to use a roller or sprayer for the coating application, cover the pool water with a tarp to prevent any debris or coating from falling in.
Taking the time to mask and protect these areas will save you from unnecessary cleanup later on and ensure a professional-looking result.
Prime the Pool Deck (If Required)
Some pool deck coatings require the use of a primer to help the coating adhere properly. Primers are typically recommended for porous surfaces like concrete, as they can fill in any micro-cracks and provide a smoother base for the coating.
- Check the instructions of your chosen floor coating to see if a primer is needed.
- If primer is necessary, apply it evenly across the entire surface using a roller or brush. Be sure to follow the manufacturer’s drying times before applying the floor coating.
Priming is an essential step for ensuring the longevity of your coating, especially for high-traffic areas like pool decks, where wear and tear are inevitable.
Choose the Right Time and Weather Conditions
Timing is everything when it comes to applying floor coatings. Weather conditions play a significant role in how the coating cures and adheres to the surface.
- Aim for a day with mild temperatures (ideally between 50°F and 85°F) and low humidity levels. High humidity or rain can interfere with the drying process, while extreme heat may cause the coating to dry too quickly.
- Avoid applying the coating in direct sunlight if possible. Early mornings or late afternoons are often the best times for this type of project.
Pay attention to the weather forecast, as some coatings may require several hours or even days to fully cure, and you don’t want rain or moisture disrupting the process.
Final Surface Preparation
Once the surface is clean, repaired, etched (if necessary), masked, and primed, you’re almost ready to apply the floor coating. However, before you begin, it’s important to do one last check.
- Make sure the surface is completely dry. Any remaining moisture can lead to bubbles or peeling in the final coating.
- Ensure all repairs are fully set and smooth to the touch.
- Remove any lingering dust or debris with a quick sweep or vacuum.
With your pool deck fully prepared, you’re ready to move on to the exciting part — applying the floor coating and transforming your outdoor space into a fresh, protected, and inviting area for relaxation and fun.
Final Thoughts
Proper preparation is the foundation of a successful floor coating application. By following these detailed steps, you’ll ensure that the coating adheres well, provides long-lasting protection, and enhances the look of your pool deck for years to come. Whether you’re doing it yourself or hiring a professional, thorough preparation is the key to a flawless, durable finish.